

Swiss Post Digital Commerce for PrestaShop
swisspost / documentation version 2.0.0
Introduction
- Plugin Name : Swiss Post Digital Commerce API
- Version : v 2.0
- Author : FirstPoint Sàrl
- Support : click here
First of all, thank you for purchasing this plugin.
This documentation is to help you with each step of the configuration. Please go through the documentation carefully to understand how the plugin works and how to configure it properly.
Requirements
You will need a contract with Swiss Post to use the Digital Commerce
API.
If you already have credentials, you may skip these steps.
- First, you must obtain a billing relationship with Swiss Post, which can be accessed here.
- You will then recieve a franking license from your direct manager at Swiss Post.
- The credentials for the API can be retrieved here.
If you are planning to use the Swiss Post Barcode service, you must also register with Swiss Post for the Barcode service.
This step is mandatory for the plugin to work.
Supported type of shippment
Letters :
- Post A+ (up to 25 x 17.6 cm, 1–250 g, max. 2 cm thick)
Parcels :
- PostPac Priority
- PostPac Economy
- Bulky goods Priority
- Bulky goods Economy
- PostPac Priority GAS
- PostPac Economy GAS
- Swiss-Express Moon
- Saturday Delivery
- Vinolog
How to install
Upload via PrestaShop Admin
The easiest way to install the module is through the PrestaShop Admin.
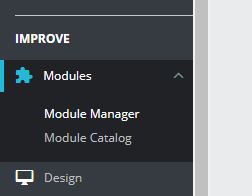
Go to your PrestaShop admin and visit Modules » Module Manager.

Click Upload a module at the top of the page.
This will open the plugin upload modal. Click select file and select the plugin ZIP file or drag and drop the ZIP file directly into the designated area.
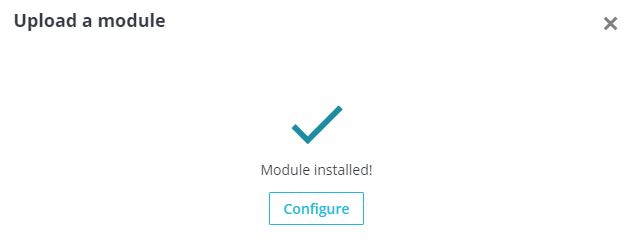
After the upload, click Configure and proceed with the next step.
Upload via FTP Server
In some rare cases, your PrestaShop hosting provider may have file restrictions that could limit your ability to install a module from the admin area.
In this situation, you need to install the module manually with FTP using these steps (not recommended for beginners).
- First, you will need to extract the plugin ZIP file on your computer.
- Open the FTP client on your computer and connect to your website
- Navigate to the /modules/ folder
- upload the folder you extracted from the zip file to the /modules/ folder on your web server.
- Visit the PrestaShop admin area and click on the Modules » Module Catalog link in the admin menu and search for the module.
- You need to click on the Install link to start using module.
If you do not have any technical experience, we recommend contacting support for help.
Setup your credentials
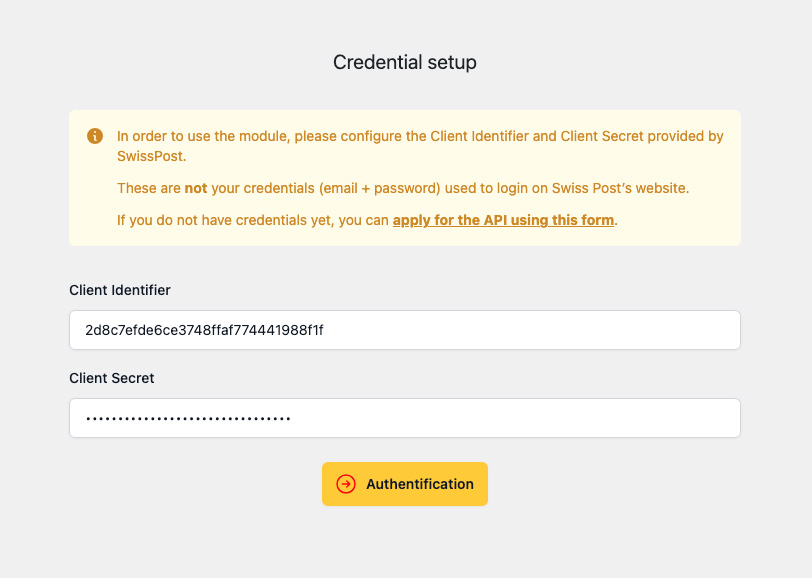
To access the configuration page, please go to your PrestaShop admin area, then visit Modules » Modules Manager » Swiss Post and then click "Configure".

To setup the module, please complete the fields Client Identifier and Client Secret. These credentials were provided by Swiss Post during registration and are mandatory for the module to work.
If you do not have credentials yet, see requirements.
Once you have successfully configured your credentials, you will have access to the dashboard and you will be able to choose which services you would like to use

Endpoints
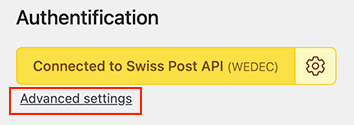
Since June 2023, the default endpoint has changed from WEDEC to DCAPI. You can change your preferred endpoint here if you have access to both endpoints.
Do not forget to save your changes when you're done!
Barcodes
The barcodes service allows you to generate shipping labels for your packages, containing the address of the sender, the recipient, the delivery method, its options and the tracking barcode
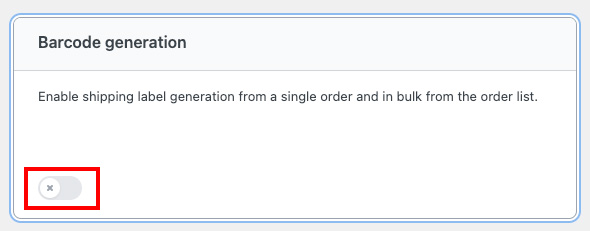
Barcodes service setup
To access the barcode configuration, you must click on the "Barcodes" toggle.
Franking licence(s)
In order to configure the plugin to use the Barcodes service, you must setup your franking license(s).
If you add multiple franking licenses, a dropdown selection will be available when generating barcodes to choose which license to use for every label.
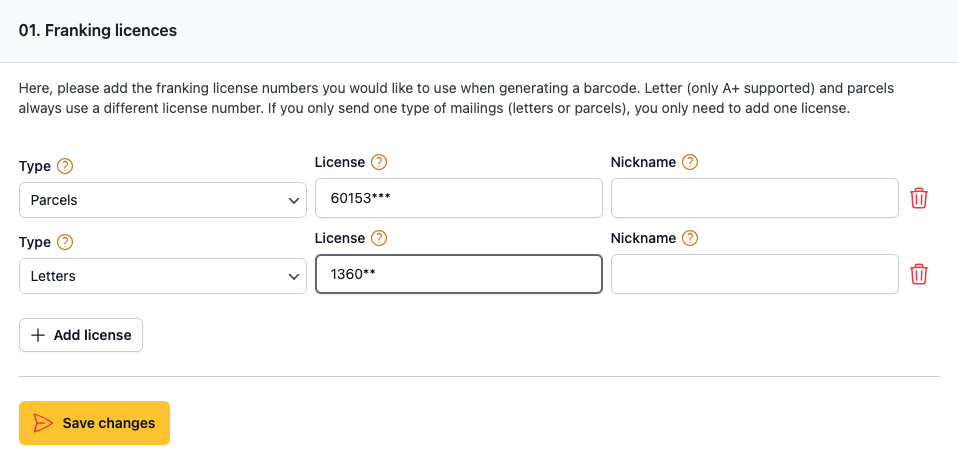
Type : Based on the information you received from Swiss Post, please choose if
this licence is for parcels or letters.
License : the licence number is a sequence of 6 to 8 numbers.
Nickname : Optionnaly give a nickname to this licence, the module will then
display the nickname instead of the licence number in the backoffice.
Please note that letters and parcels have different franking licences
Delivery methods, options and handling
All the delivery methods, delivery options and handling options available with the plugin are listed. You can check the ones best suited for your activity to simplify the interface on the admin order page.
Please note that the delivery methods & handling options you enable here don't determine how each label will be generated, but what options are actually available when generating a barcode. It simply removes options you will never use.
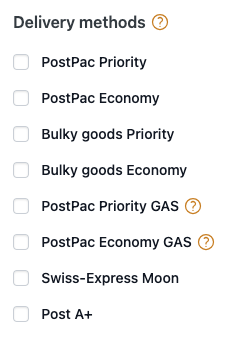
Delivery methods determine the type of shipment, delivery time, and rates.
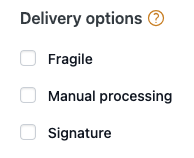
Delivery options determine ways of processing a mailling
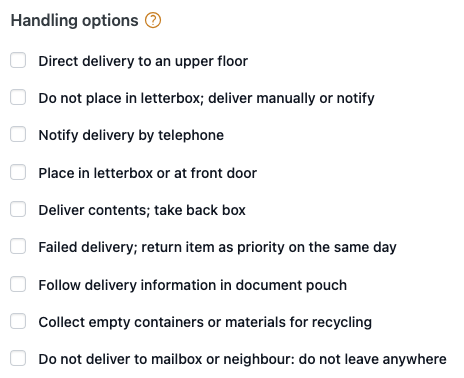
Handling options provide instructions to the delivery man for delivery or returns
Printing options
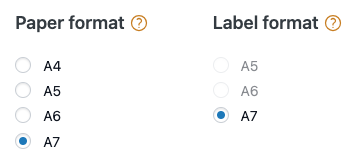
Paper format : This is the actual paper size you print your labels on. For example, if you use an A4 sheet with 4 A6 labels, you would choose A4 here. If you use a thermal label printer or print on the final format paper, please choose the final format here and in “Label format”.
Label format : This is the final label format you use. For example, if you use an A4 sheet with 4 A6 labels, you would choose A6 here. If you use a thermal label printer or print on the final format paper, please choose the final printed format here and in “Paper format”.
Status after label generation
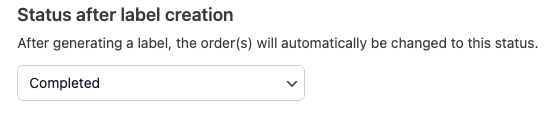
The plugin will automatically change the status of your order upon a successfully generated barcode label, the most common use would be to set this to a Completed status. This is particularly useful when using the bulk order functionality as it prevents you from having to change every order's status individually.
Sender address
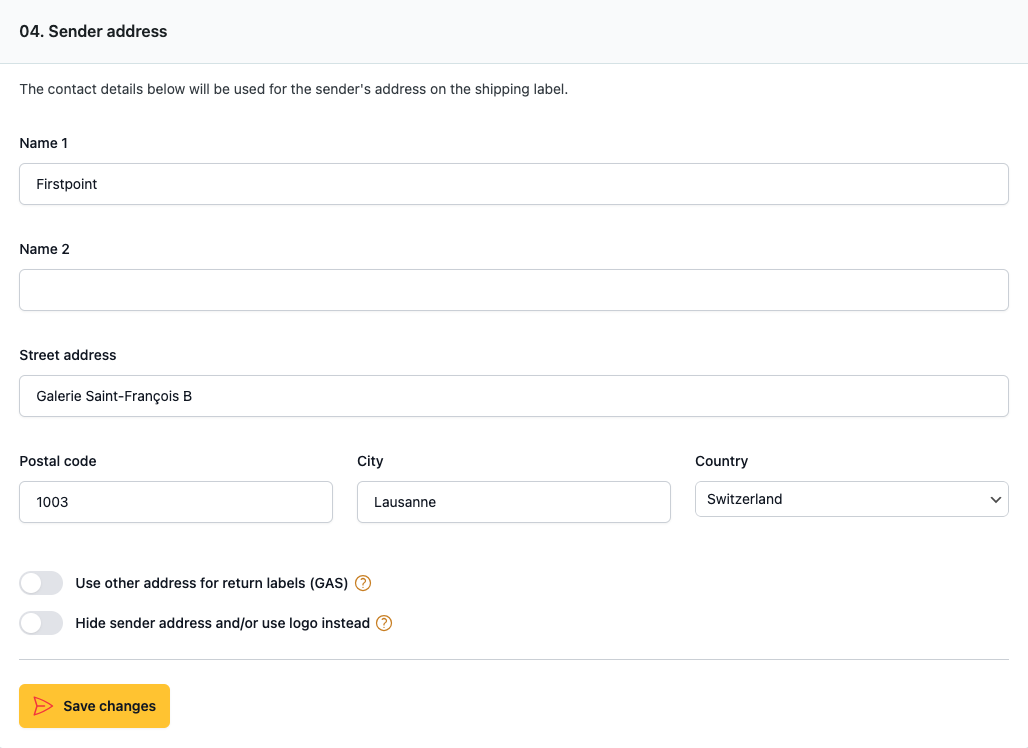
Use other address for return labels (GAS) : Only if you use PostPac GAS (returns from your customers). If you don't select this option, the same sender address will be used for GAS returns.
Hide sender address and/or use logo instead : If you select this option without uploading a logo, no sender address will be printed on the label. If you upload a logo, it will replace the sender address.
Logo
By default, the plugin will display your shop address as the sender on the barcode labels.
You may choose to display a logo instead of your address by uploading a logo.
The placement of your logo can be adjusted to your preferences using the rotation, aspect ratio, horizontal alignment and vertical alignment options.
Notifications
After placing an order, Swiss Post can inform your customers by email about the status of their shipment. This service is now free of charge (SMS notifications are no longer supported by Swiss Post).
Notifications are sent only to customers who have activated the “My consignments” service in their Swiss Post customer account.
For more information or to activate the service, your customers can visit:
Notification service – post.ch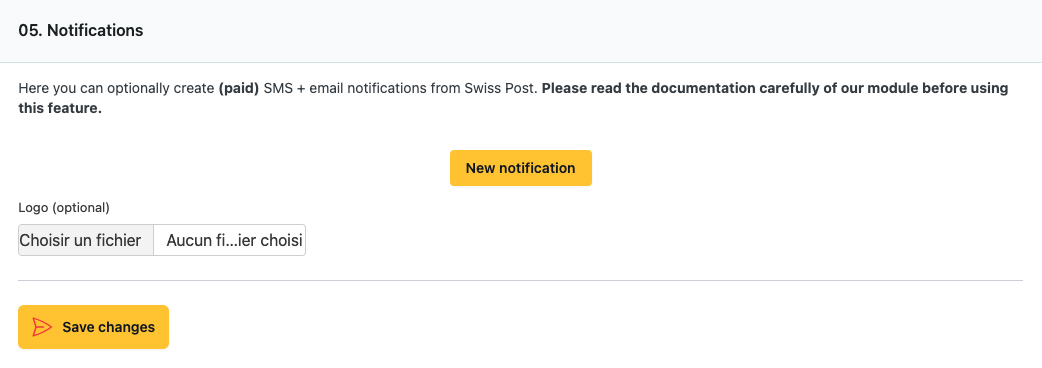
You may choose a logo to be displayed in notifications; this field is not required.
In order to set up the notifications you wish to use, you may use the notification builder. This tool allows you to add as many notification services as you want.
- Service: The notification service you wish to use.
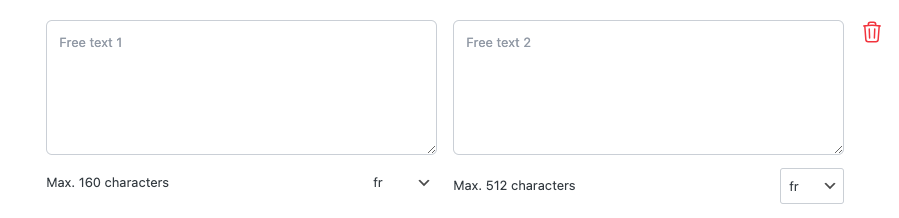
- Free texts (optional): For most e-mail notifications, you can provide texts which will be included, the content is up to you.
If your shop offers customer side language support, be sure to provide the texts in all languages using the language switcher.
Single order usage
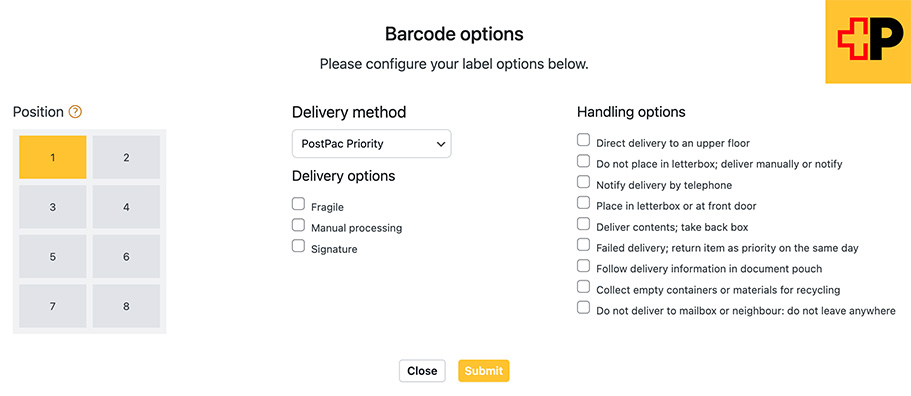
You can generate a barcode for a single order from the order details page in the PrestShop admin area.
To do so, you will find a new order section named SwissPost barcodes, here you can configure your label options.
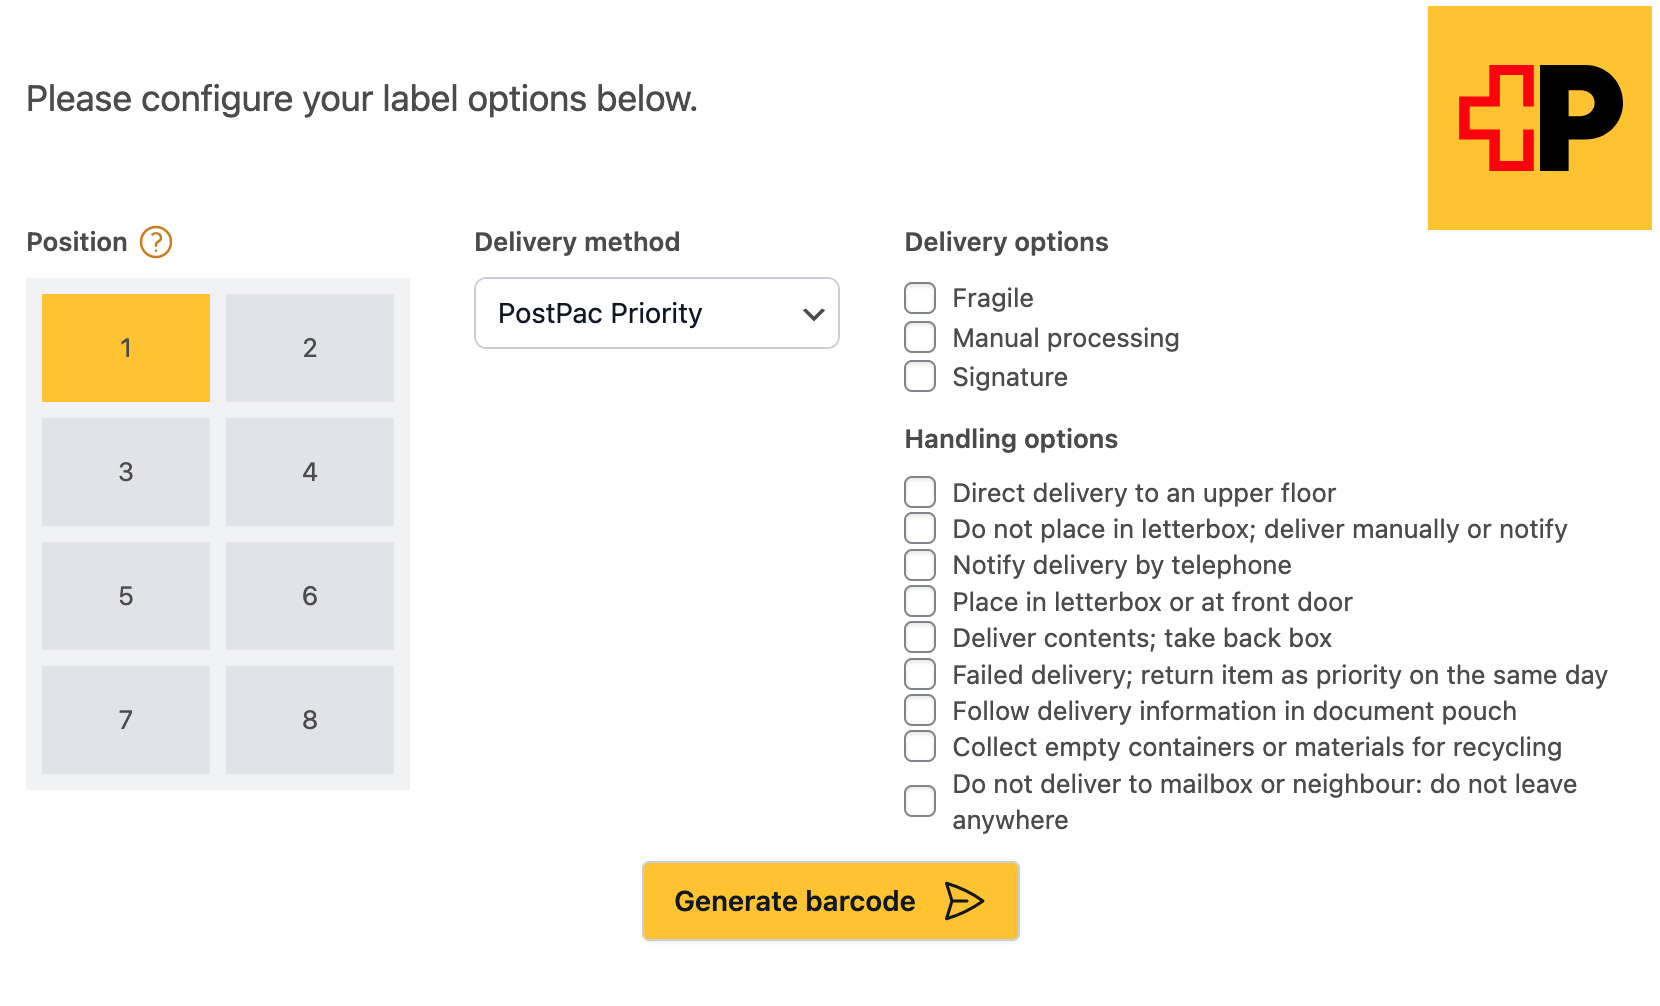
Position : You configured a printing paper format that has multiple labels on it. Please choose on which position the first label should be printed. The next labels (in bulk mode) will be printed in the following positions..
Once you are satisfied with your barcode configuration, please click Generate barcode to generate the barcode labels.
If the download does not start automatically, simply click on the displayed download link.
Bulk order usage
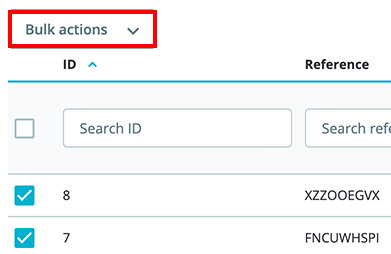
You can also generate barcodes for multiple orders in one go. Visit Your shop backoffice » Orders and check the wanted orders in the list.
You will find a new action named Generate barcodes available in the "Bulk actions" dropdown, please select it, then click Apply.
A pop-up modal will appear showing the different options available.
Position : You configured a printing paper format that has multiple labels on it. Please choose on which position the first label should be printed. The next labels (in bulk mode) will be printed in the following positions.
In bulk generation mode, the same options will be used for each generated barcode label.
Shipment tracking
You can find tracking numbers and tracking links in the order barcode generation modal
Address validator
The address validation service displays a button below the address form in the checkout allowing your customers to check whether their address is recognized and considered valid by Swiss Post. If not, corrections will be proposed. There is no obligation to use it, your customers can still use an unvalidated address for their order.
Configuration
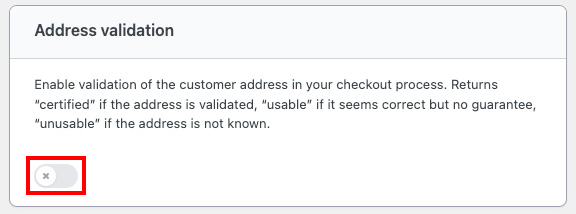
To allow your customers to validate their addresses with Swiss Post, please ensure you have activated the service in the plugin configuration.
Usage

Users can validate their Billing and Shipping addresses during checkout by using the Validate my address with Swiss Post button at the bottom of the form.

The button will become red or green depending on the status returned by Swiss Post.
Address autocomplete
To allow your customers to autocomplete their addresses with Swiss Post, please ensure you have activated the service in the plugin configuration.
Configuration

To allow your customers to autocomplete their addresses with Swiss Post, please ensure you have activated the service in the plugin configuration.
Usage
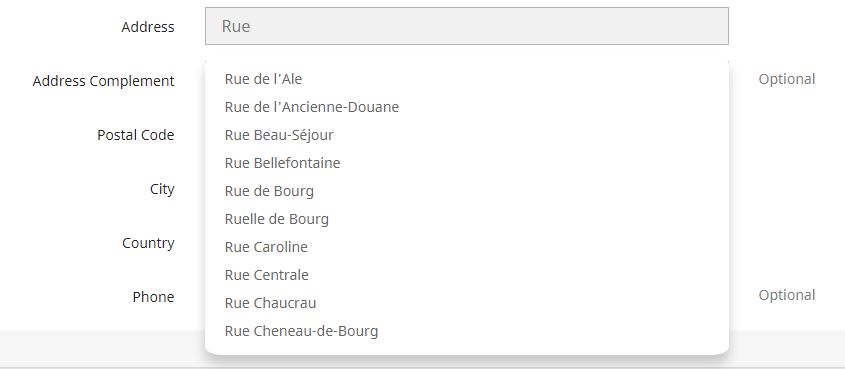
Auto-completion will occur whilst completing the Billing and Shipping address forms.
Version History (Changelog)
You can also find the version history (changelog.txt) file in the plugin folder and on the plugin sale page.
Once again, thank you for purchasing this plugin.
Changelog
                                    *** SwissPost Changelog ***

                                    2023-11-13 - version 2.0.0
                                    * New user guiding/configuration interface
                                    * Added PrestaShop 8 compatibility
                                    * Added A+ letter delivery method
                                    * Added possibility to print multiple labels per page
                                    * Added new DCAPI endpoints
                                    * Added sender address and return address form
                                    * Improved exception management
                                    * Improved styling
                                    * Removed test environment

                                    2021-12-01 - version 1.0.2
                                    * PSF005 - Reload page after label generation for status update
                                    * PSF006 - Seperate firstname and lastname to prevent long name errors
                                    * PSF007 - Fix double payment issue on orders
                                    * PSF008 - Fix JS errors on other module configuration pages
                                    * PSF009: Fix address length limitations and add address line 2 to labels

                                    2021-06-04 - version 1.0.1
                                    * PSF001 - Fixed "Failed to load PDF document" issue
                                    * PSF002 - Fixed status update issue
                                    * PSF003 - Added address line 2 to labels
                                    * PSF004 - Fixed notification DynPic error
                                    * PSM001 - overridable barcode request


                                    2021-04-20 - version 1.0.0
                                    * Initial release
Support
FirstPoint is a digital agency based in Lausanne (Switzerland) and is mandated by
Swiss Post for the development of its e-commerce plugins
for Woocommerce & PrestaShop. If you have problems with the plugin and the
documentation does not answer them, we will be happy to help you.
To reach out to us, please use this link:
https://addons.prestashop.com/en/contact-us?id_product=51386